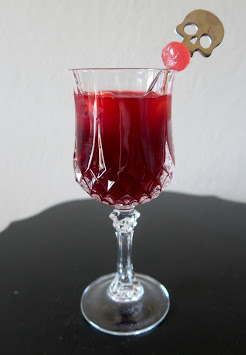
Haven't you always wanted to feel more authentically like a vampire while getting drunk at the same time? I've always wondered why I could never find a recipe for an alcoholic drink, be it a punch or cocktail, that resembled blood beyond just being red. Why was there nothing out there with the consistency of blood, too?
The goal for this recipe was to avoid food colouring, and get it the right colour just with the ingredients. Theoretically you could make just about any drink red by adding food colouring, but that feels like cheating.It also needed to taste good. What I really wanted to achieve, was an alcoholic drink that felt and moved like blood. This may not be perfect but it was the closest I could get whilst maintaining the flavour. Be the coolest/weirdest host ever by providing your guests with a punch that not only looks, but feels like blood. Best of all, it tastes lovely and makes for easy drinking. Serve it cooled, or leave it slightly warm to make it feel creepier. You can add ice cubes (I recommend ice with red food colouring in it) but remember if you put ice into a pitcher or punch bowl, this will dilute the punch and thin its consistency as it melts.
Best Halloween punch ever? I think so. The recipe can be scaled up or down to make a whole bowl or pitcher of punch, or just a couple of cocktails. The recipe below yields two or three servings. Simply multiply the recipe depending on how many people you're likely to be serving. For example, if you're serving 12 guests, multiply the ingredients by 6. For 20 guests, by 10, and so forth. The measurements don't have to be exact!
You will need:
150ml/5oz Red wine (merlot or cabernet sauvignon)
30ml/1oz Cherry brandy or cherry liqueur
60ml/2oz Vodka
30ml/1oz Raspberry syrup or cordial
30ml/1oz Grenadine
120ml/4oz Pomegranate juice
3tsp. Arrowroot powder
Method:
In a small, separate dish, mix the arrowroot with 3 teaspoons cold water. Stir until you have a smooth white liquid with no lumps.
Put the other ingredients together into a pot on the stove.
Heat carefully over medium heat. It should get hot but not boil, about 80˚C/176˚F. Do not let it boil!
Gradually add the arrowroot liquid into the pot, stir consistently.
You should start to feel the mixture thicken slightly as you stir, this only takes a minute or two.
Remove from the heat and put into a heat safe container. Put in the fridge to cool for 30 minutes or until cooled. Leaving it for too long will cause it to congeal a bit.
Pour into a punch bowl, pitcher, or cocktail glasses. Garnish and serve!
If you make this yourself, please (if you can) take a photo and tag me on social media so I can see your creation! Enjoy and have a safe and happy Halloween xx
What's more appetising, I ask you, than biting into a huge fat venomous spider? And which deadly spider is more instantly familiar than our cannibalistic friend the black widow? God they're creepy aren't they. Even looking at this photo below gives me the creepy crawlies. Anyway, I long thought it would be a fun idea to make chocolate truffles decorated to look like spiders. They'd make a nice addition to a spooky afternoon tea, a Halloween party, a children's party, or just whenever you feel like baking spooky sweets.
Black Widow with hourglass marking. Source: Albuquerque Journal
Now I'm aware they don't look precisely like the real thing, but if you have the skills to make the red abdominal pattern more accurate to nature then by all means go ahead, just please take a photo and tag me so I can see it and be impressed. Widow spiders come in many varieties, but I think the red 'hourglass' shape is pretty easily identifiable. On real spiders it's sometimes underneath, but you can't see the underside of these truffles so that'd be a bit daft wouldn't it.
This was fairly time consuming, but the hardest part was tracing around the spider stencils and cutting them out. If you're more artistically talented than I, you might want to draw spider shapes straight onto the black card instead of printing out an image. This recipe yielded enough for about 10 of my fairly large ones, but you can make them any size you like.
Ingredients:
100g unsalted butter
100g dark chocolate
1tsp cocoa
1 cup icing sugar +
Cherries (morello, glacé, etc.)
Rum, rum essence, or vanilla essence
Black fondant
Red fondant
For spider bases:
Black card stock (fairly stiff, not paper)
Cardboard
Glue
Pencil
Scissors
Bases Method:
Print out the image at the bottom of this post.
Glue image into cardboard.
Cut around the image carefully to create a stencil.
Hold the stencil onto the black card stock and (this part is particularly fiddly) trace around it with a pencil.
Cut out your spiders! Arrange them on a plate or pretty tray.
Truffle Method:
In a pot, melt together the butter and chocolate on the stove, slowly stirring til combined.
Add half a cup of icing sugar, the cocoa, and the rum or vanilla essence. Stir, then add more icing sugar until the mixture is stiff and firm. 1 cup of icing sugar wasn't enough, so I added another half a cup, and a bit more cocoa for luck.
Let cool til it's comfortable to handle.
Using the spider stencil as a guide for how large the truffle should be, roll some mixture into a rough ball.
Mush a cherry (or two) into it, then roll the mixture around in your hands until it's pleasingly round. Place on a plate, it doesn't matter if the bottom flattens.
Repeat for as many truffles as you want, then put them in the fridge to chill for a couple of hours.
Flatten out the black fondant as thinly as you can, you only want it a few millimetres thick.
Lay the fondant over each truffle, and roll it in your hands until the whole truffle is covered. It doesn't matter if the underside is bare or untidy.
Flatten out some red fondant, and using a sharp knife (xacto knife or non-serrated kitchen knife) carefully cut out hourglass shapes.
Gently place the red hourglasses onto each truffle and pat to smoothen them down so they'll stay in place but not lose their shape.
Put each truffle onto the black card spider base. Serve!
Watch the video:
Here is the image I used for my black card bases if you want to print it out and use the same:
Thank you for joining me, and if you do have a go at making these, please take a photo, share it and tag me so I can see it! Til next time! x
I had this idea for ages, ever since being in Germany and eating so very many delicious Brezeln, and wondering if I could make them a different shape. Over there you can buy them unbaked and frozen in the supermarket in big boxes to bake at home, and I'd thought about just thawing those out and reshaping them. But no, that would be cheating, and it turns out they're exceedingly easy to make, and this recipe tastes exactly like the authentic thing. I didn't take this exact recipe from anywhere in particular, but rather watched a bunch of videos in German and read several different German recipes to get the gist of how they're made. These are awesome for picnics or parties. You can use a different amount of dough to make them larger or smaller to your liking. You can of course use this recipe to make pretzels in the traditional shape, but because we're weird, let's make them pentacle shaped.
Video:
Ingredients/Zutaten:
3 1/2 cups (500g) plain flour
1 cup (250ml) warm water
1 Tbsp dry active yeast or a cube of fresh yeast
1 tsp sugar
25-50g butter
3 Tbsp baking soda
Method/Zubereitung:
Put flour into a large mixing bowl (or bread machine if you're lazy like me) and make a little well in the centre.
Into the well pour your warm water. You can also use slightly warm milk instead of water.
Sprinkle the yeast onto the water (or crumble if using fresh yeast), then add the sugar. Give it a wee stir.
Having ideally let it soften first, add the butter.
Knead the dough until well mixed. Leave the dough to rise for about 20 minutes, it should hopefully double in size.
Divide the dough into about eight equal pieces, but this will depend on how big you want your pretzels to be.
Between your hands, roll the dough out into very long, thin sausages. The part for the ring should be thicker, but the star part shouldn't be much thicker than a pencil.
Make a ring and twist the ends together. Carefully lay the thinner sausage over the ring in the shape of a five-pointed star. Pinch the corners and mush the dough carefully into the ring to ensure a good shape and a good stick.
Be careful here! Boil a litre of water in a pot. Add three tablespoons of baking soda to the hot water, and turn down the heat so it stays hot but not boiling. If you are making a big batch, remember to use three tablespoons of baking soda per every litre of hot water.
Gently place each pretzel into the water, and leave it there for 30-60 seconds. Make sure the whole thing gets wet. This process is what gives the pretzel its lovely brown exterior. With a slotted spoon or similar, lift the pretzel from the water and place it on a baking tray.
While wet, sprinkle thick chunky salt on. You can use other toppings too if you really want.
Preheat oven to 180˚C (360˚F) and once heated, bake your pretzels for 20-25 minutes. They should be brown and properly baked.
Best enjoyed warm and fresh, but they'll keep for a day. Guten Appetit!
If you start talking about the 17th, 18th, or 19th centuries with me, you'll find I won't shut up for ages because I love those periods so much. For years I've done research on historical medicine, food, fashion, industry, traditions, politics, weapons, daily life, diseases, everything I can find to read or watch. Most of my research has hovered between 1650 - 1750 Britain and Europe, as this is when I've set my (I swear I'll finish it someday) novel. Also, several other writing projects in my giant unfinished pile are set then, and I like to be as true to history as possible so must therefore know everything.
Nearly every resource I've read on the 17th century references the diary of Samuel Pepys, so I thought I would just have to read that. And so I have been. Well, listening to it on audiobook through Audible, that counts as reading, does it not? It's 115 hours of listening, it's not a small undertaking. Everything mentioned in the diaries that I wasn't already familiar with, I looked up, and one of those things was "sack posset". I'm so glad I did. I think the mildly amusing name attracted me most, but I looked up as many recipes for sack posset as I could, written at the time. No two were exactly alike, so I combined the essential ingredients and rough ratios from every recipe I saw, and had a crack at making it. It was amazing. Warming, soothing, delicious, makes you all cosy and sleepy. Sack posset is generally served in the evening after supper, the last thing you give your guests before they head home.
I made an enormous basin of it on Christmas day for Mr Owl's family, and everyone enjoyed it verily. It's to be drunk hot, and is best enjoyed hot, but on boxing day, a couple of Mr Owl's cousins biffed the leftovers into an ice-cream machine and it was lovely cold, too! It felt like a Christmas-appropriate thing to make, but sack posset isn't a special occasion thing. It's for any day of the week, all year around.
But the fuck is it, I hear you ask? What is sack? What is a posset? This which we are making is essentially hot booze-custard. Posset started its life centuries ago as a strengthening medicinal drink, and over time became a sweet night cap. It finally evolved into such familiar things as custard and eggnog. Sack is a fortified wine which no longer exists. The closest modern equivalent to sack is sherry.
So here is the recipe and method, it's quite easy and only takes about 15 minutes to make. Obviously this is 18+ or 21+ depending on where you live because of alcohol laws, but I've heard the sherry can be substituted for orange and lemon juice, though I haven't tried it. The mixture can be thickened with bread crumbs if you fancy eating it with a spoon instead of drinking it, but I've not tried that either. Some old recipes suggest adding mace, crushed almonds, rosewater, musk, or even ambergris. It's a flexible recipe, you could experiment with whatever ingredients take your fancy.
Let us begin! This yields about 3 coffee mugs full, but is best served in teacups. You can warm the cups beforehand if you wish.
Ingredients:
400ml heavy cream
300ml sherry
7 egg yolks
2 egg whites
1/2 cup sugar
ground nutmeg
ground/sticks of cinnamon
Method:
Pour the cream and sugar into a pot. Sprinkle a small amount of the nutmeg and cinnamon in, and stir. Some recipes called for a blade of mace, but mace is fairly expensive so I omitted it.
Separate yolks and egg whites. There are several methods to do this, I like passing the yolk between the shell halves. You might have one of these doodads. Put the yolks into a large basin or similar. If you don't want to waste the leftover whites, you could turn them into meringues.
Crack two whole eggs in, whites included.
Add the sherry to the eggs and whisk together until eggs are beaten.
Boil some water in a pot that will comfortably sit the basin atop it. Place the egg-sherry mixture over the boiling water. If exposed to direct heat, the eggs will cook, yuck! Stir it continuously and test the temperature with a knuckle.
Put the cream-sugar pot on the stove at a medium heat. Stir this regularly too. The cream should be taken off the heat just before it starts to boil.
Once the egg-sherry mixture is warm, take the basin off the boiling water.
Carefully pour the cream into the eggs, pouring a little at a time, and stirring constantly until all is combined.
Ladle into teacups and enjoy!
I read that cushions were placed around the basin to keep it warm. It's important that it doesn't get too hot or else you'll end up with scrambled eggs, you want it at a warm, drinkable temperature. It's quite filling, you'll probably find that a couple of teacups is loads!
Watch the video:
Let us know in the video comments on YouTube if you try this out, and how it goes! Thanks for joining me, see you again soon! x
Hi! Obviously I had to try making this. I love ice cream (probably too much) and the colour black, so.
Having been unable to obtain black ice cream from anywhere, I had to try making it myself. Being a profoundly terrible cook/baker/everything, I used the easiest recipe I could find. Watch me:
Ingredients:
2 cups heavy whipping cream
1 tin sweetened condensed milk
Pinch of sea salt
Black gel food dye
Monin caramel flavour syrup
I whipped the cream until it was stiff with a stick mixer, but an electric beater would have been better. Then I poured the condensed milk onto it, the pinch of sea salt, and flavour syrup to taste. I folded it together carefully, before adding (what turned out to be) a generous amount of black gel food dye.
I found that whipping the mixture, instead of stirring, helped the colour to combine with the other ingredients better. After 24 hours this should have definitely been frozen, but thanks to my freezer being as asshole, the big reveal of my creation was a fail. The taste was alright, although it mostly tasted of condensed milk.
In future, I would use a stronger flavouring agent, and perhaps activated charcoal in addition to food colouring to create a darker colour. I would also make sure the freezer door was closed properly! Bah!
'Til next time, thanks for visiting! Would you try black ice cream?
A wall of bats is an easy way to make your bedroom, living room, or hallway look cooler and creepier. It's an effective and cheap Halloween decoration, or for all year round!
Our house is called The Belfry and a wall with a permanent flock of bats is naturally an essential feature, so I'm showing you how to make this fun, simple, and effective decoration idea. You can download and print out the bat template I used, or you can draw your own, whatever you like. Making them different sizes can give the illusion of distance as well. Be creative and enjoy!
Below is the image I used as a template, I found it at ActivityVillage and cropped it to size for you.
You will need:
Scissors or a craft knife
A piece of cardboard
Sheets of black card or stiff paper
Blu-Tack
Glue stick
A white pencil
Ps: If you make this, take a photo and link it in a comment below, or stick it on Instagram or Twitter with the hashtag #blackfridaybatwall - Happy Halloween!